Build an AI chat agent with n8n#
Welcome to the introductory tutorial for building AI workflows with n8n. Whether you have used n8n before, or this is your first time, we will show you how the building blocks of AI workflows fit together and construct a working AI-powered chat agent which you can easily customize for your own purposes.
Many people find it easier to take in new information in video format. This tutorial is based on one of n8n's popular videos, linked below. Watch the video or read the steps here, or both!
What you will need#
- n8n: For this tutorial we recommend using the n8n cloud service - there is a free trial for new users! For a self hosted service, refer to the installation pages.
- Credentials for a chat model: This tutorial uses OpenAI, but you can easily use DeepSeek, Google Gemini, Groq, Azure, and others (see the sub-nodes documentation for more).
What you will learn#
- AI concepts in n8n
- How to use the AI Agent node
- Working with Chat input
- Connecting with AI models
- Customising input
- Observing the conversation
- Adding persistence
AI concepts in n8n#
If you're already familiar with AI, feel free to skip this section. This is a basic introduction to AI concepts and how they can be used in n8n workflows.
An AI agent builds on Large Language Models (LLMs). LLMs generate text based on input by predicting the next word. They can be used to select the best tool to achieve a task, or even simulate complex decision-making, but they can't act on decisions or use tools themselves. AI agents add goal-oriented functionality. They can use tools, act on their outputs, complete tasks and solve problems.
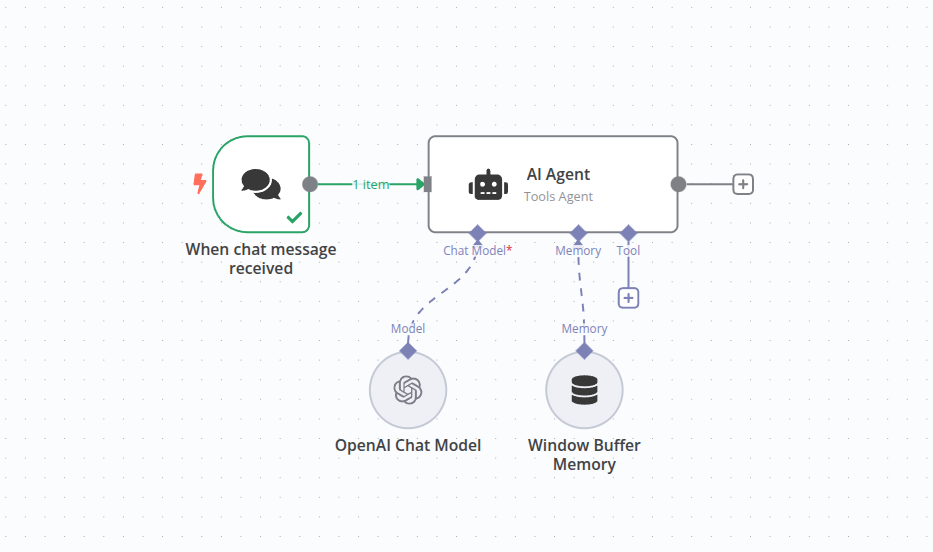
In n8n, the AI agent is represented as a node with some extra connections.
| Feature | LLM | AI Agent |
|---|---|---|
| Core Capability | Text generation | Goal-oriented task completion |
| Decision-Making | Simulates choices in text | Selects and executes actions |
| Uses Tools/APIs | No | Yes |
| Workflow Complexity | Single-step | Multi-step |
| Scope | Generates language | Performs complex, real-world tasks |
| Example | LLM generating a paragraph | An agent scheduling an appointment |
By incorporating the AI agent as a node, n8n can combine AI-driven steps with traditional programming for efficient, real-world workflows. For instance, simpler tasks, like validating an email address, do not require AI, whereas a complex tasks, like processing the content of an email or dealing with multimodal inputs (e.g., images, audio), are excellent uses of an AI agent.
1. Create a new workflow#
When you open n8n, you'll see either:
- An empty workflow: if you have no workflows and you're logging in for the first time. Use this workflow.
- The Workflows list on the Overview page. Select the
 button to create a new workflow.
2. Add a trigger node#
Every workflow needs somewhere to start. In n8n these are called 'trigger nodes'. For this workflow, we want to start with a chat node.
-
Select Add first step or press N to open the node menu.
-
Search for Chat Trigger. n8n shows a list of nodes that match the search.
-
Select Chat Trigger to add the node to the canvas. n8n opens the node.
-
Close the node details view (Select Back to canvas) to return to the canvas.
More about the Chat Trigger node...
The trigger node generates output when there is an event causing it to trigger. In this case we want to be able to type in text to cause the workflow to run. In production, this trigger can be hooked up to a public chat interface as provided by n8n or embedded into another website. To start this simple workflow we will just use the built-in local chat interface to communicate, so no further setup is required.
3. Add an AI Agent Node#
The AI Agent node is the core of adding AI to your workflows.
-
Select the Add node
 connector on the trigger node to bring up the node search.
 -
Start typing "AI" and choose the AI agent node to add it.
-
The editing view of the AI agent will now be displayed.
-
There are some fields which can be changed. As we're using the Chat Trigger node, the default setting for the source and specification of the prompt don't need to be changed.
4. Configure the node#
AI agents require a chat model to be attached to process the incoming prompts.
-
Add a chat model by clicking the plus
button underneath the Chat Model connection on the AI Agent node (it's the first connection along the bottom of the node). -
The search dialog will appear, filtered on 'Language Models'. These are the models with built-in support in n8n. For this tutorial we will use OpenAI Chat Model.
-
Selecting the OpenAI Chat model from the list will attach it to the AI Agent node and open the node editor. One of the parameters which can be changed is the 'Model'. Note that for the basic OpenAI accounts, only the 'gpt-4o-mini' model is allowed.
Which chat model?
As mentioned earlier, the LLM is the component which generates the text according to a prompt it is given. LLMs have to be created and trained, usually an intensive process. Different LLMS may have different capabilities or specialties, depending on the data they were trained with.
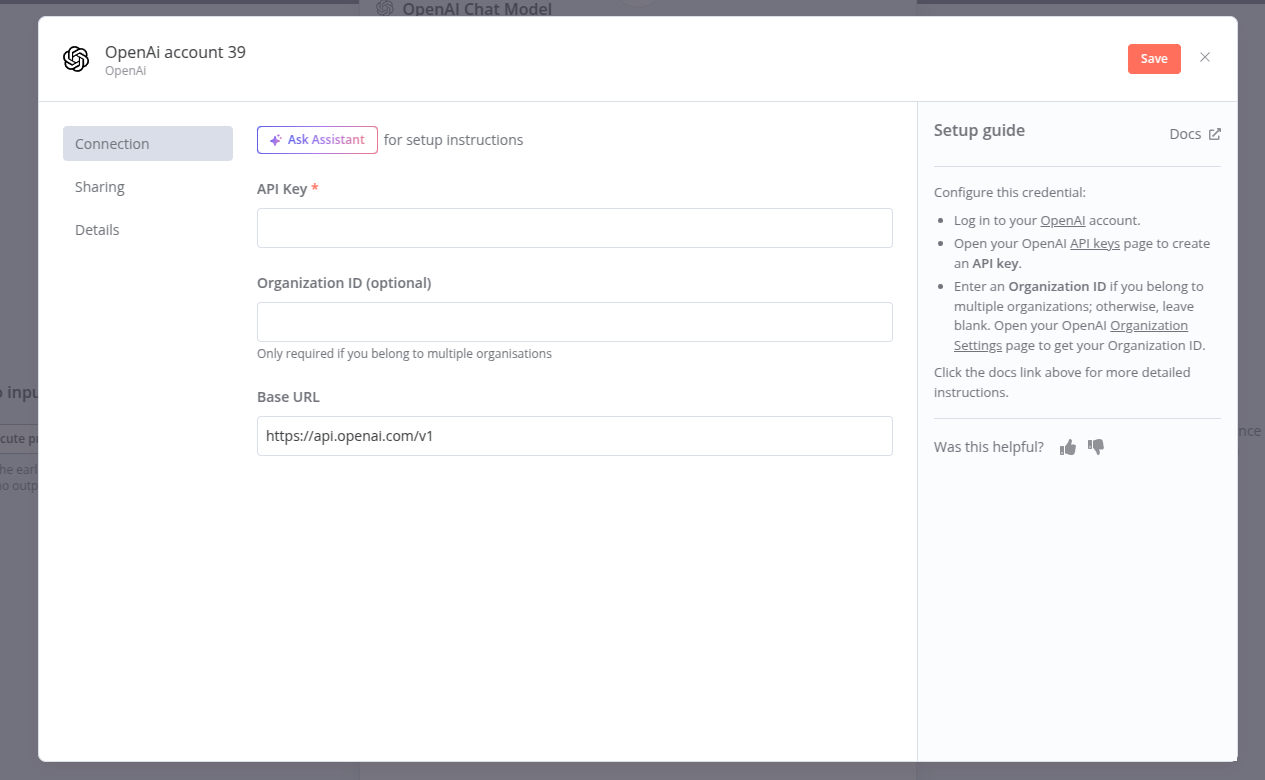
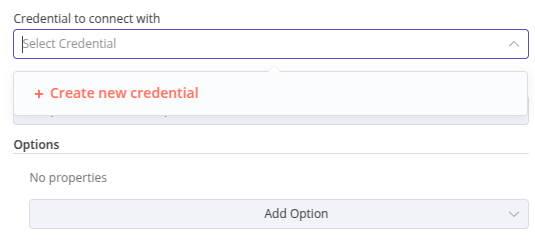
5. Add credentials (if needed)#
In order for n8n to communicate with the chat model, it will need some credentials (login data giving it access to an account on a different online service). If you already have credentials set up for OpenAI, these should appear by default in the credentials selector. Otherwise you can use the Credentials selector to help you add a new credential.
-
To add a new credential, click on the text which says 'Select credential'. An option to add a new credential will appear
-
This credential just needs an API key. When adding credentials of any type, check the text to the right-hand side. In this case it has a handy link to take you straight to your OpenAI account to retrieve the API key.
-
The API key is just one long string. That's all you need for this particular credential. Copy it from the OpenAI website and paste it into the API key section.
Keeping your credentials safe
Credentials are private pieces of information issued by apps and services to authenticate you as a user and allow you to connect and share information between the app or service and the n8n node. The type of information required varies depending on the app/service concerned. You should be careful about sharing or revealing the credentials outside of n8n.
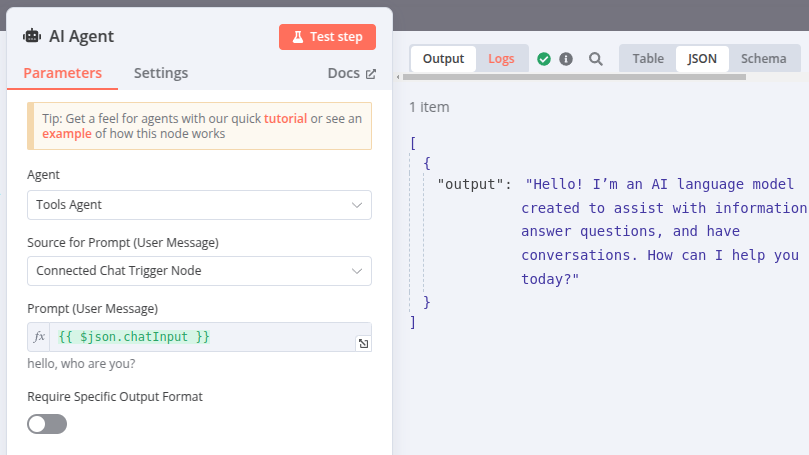
6. Test the node#
Now that the node is connected to the Chat Trigger and a chat model, we can test this part of the workflow.
-
Click on the 'Chat' button near the bottom of the canvas. This opens up a local chat window on the left and the AI agent logs on the right.
-
Type in a message and press Enter. You will now see the response from the chat model appear below your message.
-
The log window displays the inputs to and outputs from the AI Agent.
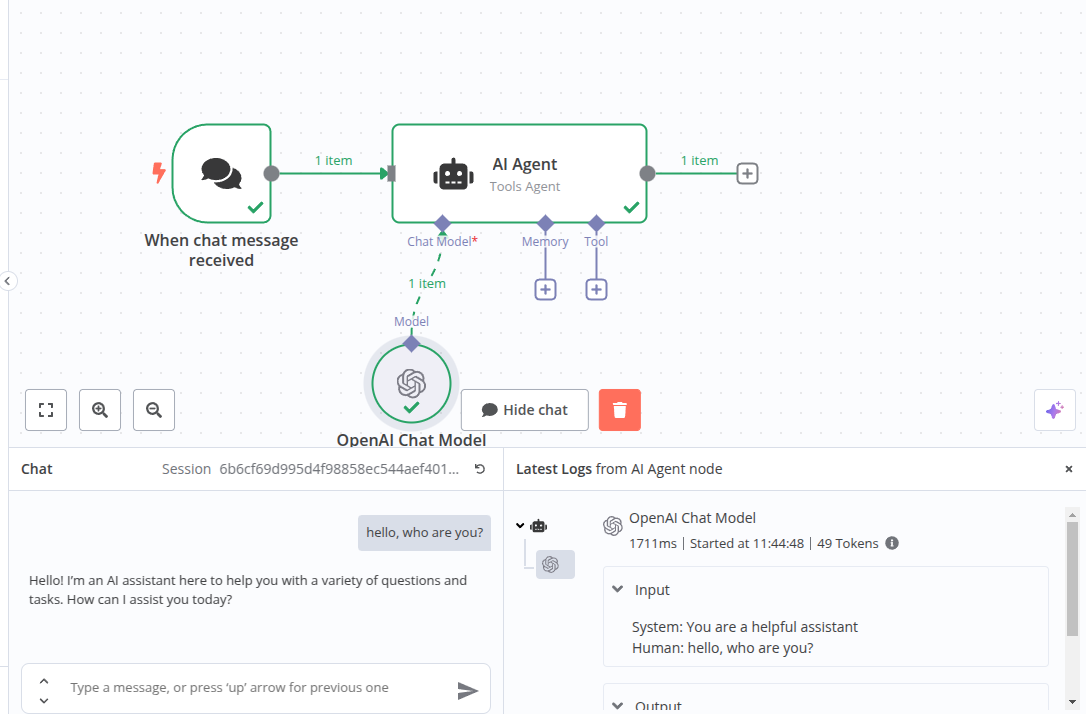
Accessing the logs...
You can access the logs for the AI node even when you aren't using the chat interface. Open up the AI Agent node and click on the Logs tab in the right hand panel.
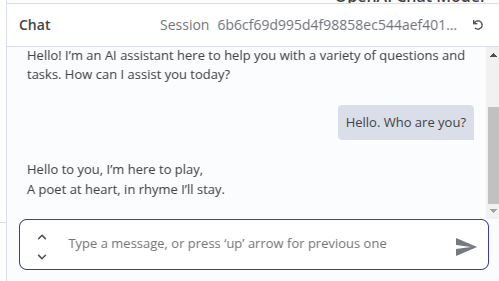
7. Changing the prompt#
The logs in the previous step reveal some extra data - the system prompt. This is the default message that the AI Agent primes the chat model with. From the log you can see this is set to "You are a helpful assistant". We can however change this prompt to alter the behavior of the chat model.
-
Open the AI Agent node. In the bottom of the panel is a section labeled 'Options' and a selector labeled 'Add Option'. Use this to select 'System message'
-
The system message is now displayed. This is the same priming prompt we noticed before in the logs. Change the prompt to something else to prime the chat model in a different way. You could try something like "You are a brilliant poet who always replies in rhyming couplets" for example.
-
Close the node and return to the chat window. Repeat your message and notice how the output has changed.
8. Adding persistence#
The chat model is now giving us useful output, but there is something wrong with it which will become apparent when you try to have a conversation.
-
Use the chat and tell the chat model your name, for example "Hi there, my name is Nick".
-
Wait for the response, then type the message "What's my name?". The AI will not be able to tell you, however apologetic it may seem. The reason for this is we are not saving the context. The AI Agent has no memory.

-
In order to remember what has happened in the conversation, the AI Agent needs to preserve context. We can do this by adding memory to the AI Agent node. On the canvas click on the
on the bottom of the AI Agent node labeled "Memory". -
From the panel which appears, select "Simple Memory". This will use the memory from the instance running n8n, and is usually sufficient for simple usage. The default value of 5 interactions should be sufficient here, but remember where this option is if you may want to change it later.
-
Repeat the exercise of having a conversation above, and see that the AI Agent now remembers your name.
9. Saving the workflow#
Before we leave the workflow editor, remember to save the workflow or all your changes will be lost.
- Click on the "Save" button in the top right of the editor window. Your workflow will now be saved and you can return to it later to chat again or add new features.
Congratulations!#
You have taken your first steps in building useful and effective workflows with AI. In this tutorial we have investigated the basic building blocks of an AI workflow, added an AI Agent and a chat model, and adjusted the prompt to get the kind of output we wanted. We also added memory so the chat could retain context between messages.
Next steps#
Now you have seen how to create a basic AI workflow, there are plenty of resources to build on that knowledge and plenty of examples to give you ideas of where to go next:
- Learn more about AI concepts and view examples in Examples and concepts.
- Browse AI Workflow templates.
- Find out how to enhance the AI agent with tools.