Google: OAuth2 single service#
This document contains instructions for creating a Google credential for a single service. They're also available as a video.
Note for n8n Cloud users
For the following nodes, you can authenticate by selecting Sign in with Google in the OAuth section.
Prerequisites#
- Google Cloud account
- Google Cloud Platform project
- If you haven't used OAuth in your Google Cloud project before, you need to configure the OAuth consent screen.
- If using Google Perspective: Request API Access
- If using Google Ads: Developer Token
Set up OAuth#
Create a new credential in n8n#
- Follow the steps to Create a credential. If you create a credential by selecting Create new in the credentials dropdown in a node, n8n automatically creates the correct credential type for that node. If you select Credentials > New, you must browse for the credential type. To create a credential for a custom API call, select Google OAuth2 API. This allows you to create a generic credential, then set its scopes.
-
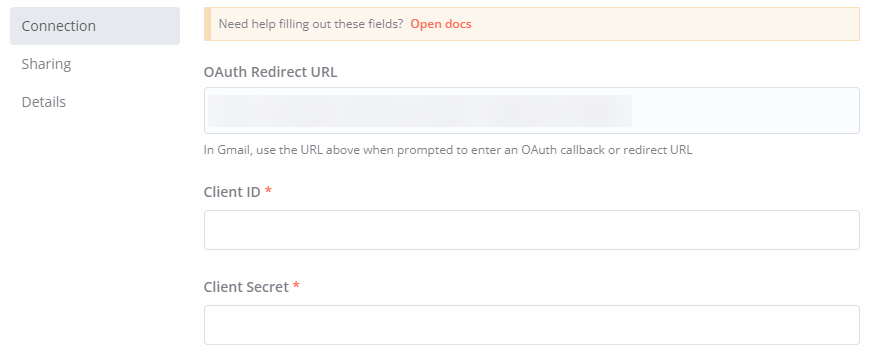
Note the OAuth Redirect URL from the node credential modal. You'll need this in the next section.
View screenshot
Set up OAuth in Google Cloud#
-
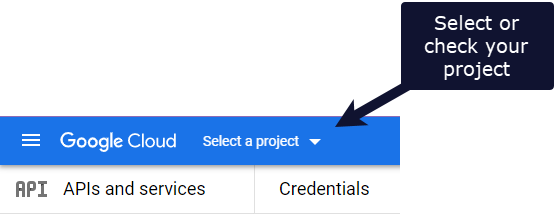
Go to Google Cloud Console | APIs and services and make sure you're in the project you want to use.
View screenshot
-
Optional: If you haven't used OAuth in your Google Cloud project before, you need to configure the OAuth consent screen. Expand the detailed steps below for more guidance.
View detailed steps
- Select OAuth consent screen.
- For User Type, select Internal for user access within your organization's Google workspace or External for any user with a Google account.
- Select Create.
- Enter the essential information: App name, User support email, and the Email addresses field in Developer contact information.
- Add an authorized domain: select + ADD DOMAIN. Enter
n8n.cloudif using n8n's Cloud service, or the domain of your n8n instance if you're self-hosting. - Select SAVE AND CONTINUE to go to the Scopes page.
- You don't need to set any scopes. Select SAVE AND CONTINUE again to go to the Summary page.
- On the Summary page, review the information, then select BACK TO DASHBOARD.
-
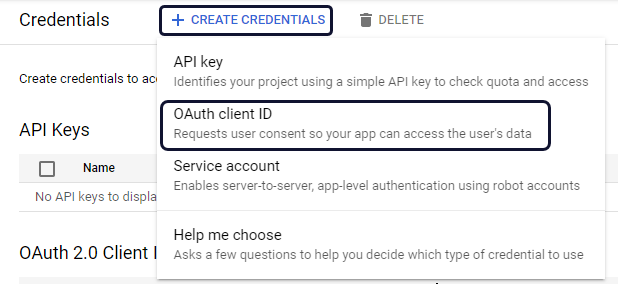
Select + CREATE CREDENTIALS > OAuth client ID.
View screenshot
-
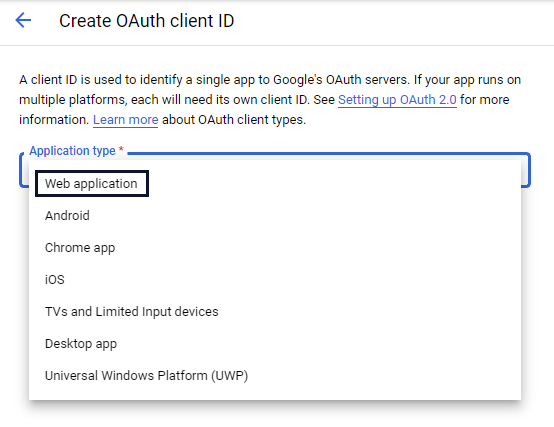
In the Application type dropdown, select Web application. Google automatically generates a name.
View screenshot
-
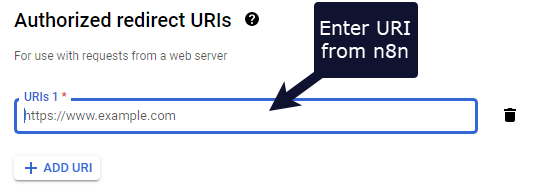
Under Authorizes redirect URIs, select + ADD URI. Paste in the OAuth redirect URL from n8n.
View screenshot
-
Select CREATE.
-
Enable each Google service API that you want to use:
- If using Google Perspective or Google Ads: Request API Access for Perspective or a Developer Token for Ads.
- Access your Google Cloud Console - Library. Make sure you're in the correct project.
-
Search for and select the API(s) you want to enable. For example, for the Gmail node, search for and enable the Gmail API.
Some integrations need additional APIs
The following integrations require the Google Drive API, as well as their own API:
- Google Docs
- Google Sheets
- Google Slides
-
Select ENABLE.
Create and test your connection#
In n8n:
- Enter your new Client ID and Client Secret from Google Cloud Console in the credentials modal.
- Select Sign in with Google to complete your Google authentication.
- Save your new credentials.
Video#
Troubleshooting#
Google hasn't verified this app#
If using the OAuth authentication method, you might see the warning Google hasn't verified this app. To avoid this, you can create OAuth credentials from the same account you want to authenticate.
If you need to use credentials generated by another account (by a developer or another third party), follow the instructions in Google Cloud documentation | Authorization errors: Google hasn't verified this app.
Google Cloud app becoming unauthorized#
For Google Cloud apps with Publishing status set to Testing and User type set to External, consent and tokens expire after seven days. Refer to Google Cloud Platform Console Help | Setting up your OAuth consent screen for more information. To resolve this, reconnect the app in the n8n credentials modal.