Tutorial: Build an AI workflow in n8n#
This tutorial introduces LangChain functionality in n8n. You can work through it with no prior knowledge of LangChain, AI, or n8n. However, if you've never used n8n before, you should also do the Longer quickstart, which introduces key n8n concepts.
In this tutorial you will:
- Create a workflow from scratch. It uses the Chat Trigger to simulate and test chat interactions, ChatGPT to power the chat functionality, and a custom tool to connect to other n8n workflows.
- Understand key concepts, including:
- The role of agents, models, and tools when building AI functionality.
- Cluster nodes in n8n: groups of root and sub-node.
- Loading your own data into AI workflows.
Step one: Sign up for n8n#
Skip this section if you've already installed n8n or signed up for a Cloud account
n8n is available as a Cloud service, npm module, and Docker image. For this quickstart, n8n recommends using Cloud. A free trial is available for new users.
n8n version 1.21.0 or above
This tutorial requires n8n version 1.21.0 or above.
Step two: Create a new workflow#
When you open n8n, you'll see the Workflows list.
To create a new workflow for this tutorial:
- If you have no workflows, select Start from scratch.
- If you already built a workflow, select Add workflow.
Step three: Add a trigger node#
A trigger node starts a workflow. For this tutorial, use the Chat Trigger. This provides a chat interface that you can use to test the workflow.
- Select Add first step.
- Search for Chat Trigger. n8n shows a list of nodes that match the search.
- Select Chat Trigger to add the node to the canvas. n8n opens the node.
- Close the node details view to return to the canvas.
Step four: Add an agent#
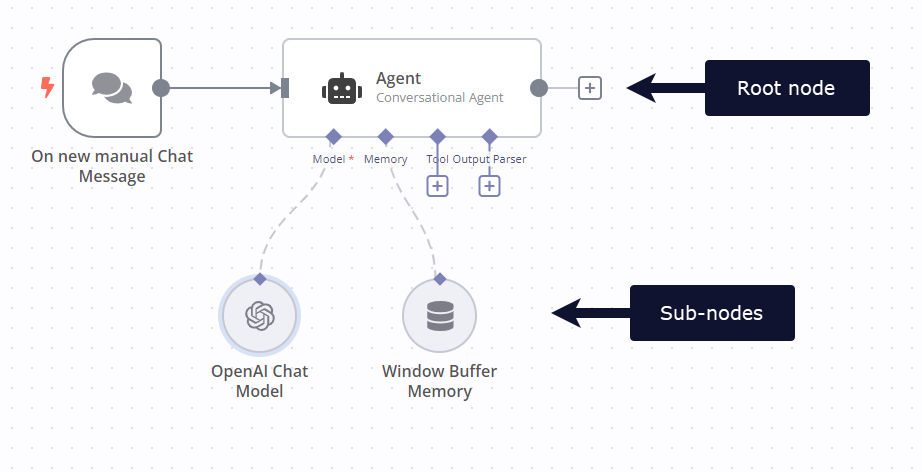
An agent takes an input, such as a user query, then uses a collection of tools to respond. In n8n the AI Agent node is a root node: a node whose behavior you can configure using sub-nodes.
Cluster nodes: root and sub-nodes
Cluster nodes are node groups that work together to provide functionality in an n8n workflow. Instead of using a single node, you use a root node and one or more sub-nodes. This allows extensive configuration of node functionality.
- Select the Add node
 connector. n8n opens the nodes panel.
 - Search for Agent. n8n shows a list of nodes that match the search.
- Select AI Agent. n8n adds the node to the canvas and opens it.
- Close the node details view to return to the canvas.
Step five: Chat functionality#
To provide chat interactions, the workflow needs:
- A chat model, to process chat inputs and generate responses.
- Memory, so that the workflow can remember and use previous sections of the chat.
Use the connectors on the bottom of the AI Agent node to connect the following:
-
Model: OpenAI Chat Model. Set up the credentials for this node.
Credential setup steps
- Create an account with OpenAI.
- Create API key.
- In the OpenAI Chat Model node, select Credential to connect with > Create New Credential to open the credential modal.
- Paste the API key into API Key.
- Select Save. n8n tests the connection and confirms if the key is working.
- Close the credential modal.
-
Memory: Window Buffer Memory
Step six: Get data from another n8n workflow#
One unique feature of AI in n8n is the ability to pull in data from other n8n workflows using the Custom n8n Workflow Tool node. This means you can:
- Load your own custom data
- Create custom functionality in another workflow
Because n8n can connect to any service with a public API, this is a powerful tool.
This example generates some fake data in a workflow, and loads it in to the AI workflow. The AI workflow passes a parameter to the workflow generating the data, to ensure it only returns data that's intended to be public.
- Create a new workflow, then copy in this workflow JSON:
The workflow uses the Code node to generate a sample data set, containing a list of fruits, their colors, and whether this information should be public or private.
  1
  2
  3
  4
  5
  6
  7
  8
  9
 10
 11
 12
 13
 14
 15
 16
 17
 18
 19
 20
 21
 22
 23
 24
 25
 26
 27
 28
 29
 30
 31
 32
 33
 34
 35
 36
 37
 38
 39
 40
 41
 42
 43
 44
 45
 46
 47
 48
 49
 50
 51
 52
 53
 54
 55
 56
 57
 58
 59
 60
 61
 62
 63
 64
 65
 66
 67
 68
 69
 70
 71
 72
 73
 74
 75
 76
 77
 78
 79
 80
 81
 82
 83
 84
 85
 86
 87
 88
 89
 90
 91
 92
 93
 94
 95
 96
 97
 98
 99
100
101
{ "name": "Workflow tool example", "nodes": [ { "parameters": { "jsCode": "return [{\"fruit\": \"apple\", \"color\": \"green\", \"dataPrivacyLevel\": \"public\"},{\"fruit\": \"banana\", \"color\": \"yellow\", \"dataPrivacyLevel\": \"public\"},{\"fruit\": \"tomato\", \"color\": \"red\", \"dataPrivacyLevel\": \"private\"}]" }, "id": "4a30b74c-ed27-4668-8e68-c2e3a630ecd9", "name": "Code", "type": "n8n-nodes-base.code", "typeVersion": 2, "position": [ 1180, 500 ] }, { "parameters": { "conditions": { "string": [ { "value1": "={{ $json.dataPrivacyLevel }}", "value2": "={{ $('Execute Workflow Trigger').item.json.visibility }}" } ] } }, "id": "eb479841-8099-4537-b89b-4b9867446688", "name": "Filter", "type": "n8n-nodes-base.filter", "typeVersion": 1, "position": [ 1380, 500 ] }, { "parameters": { "aggregate": "aggregateAllItemData", "include": "specifiedFields", "fieldsToInclude": "fruit, color", "options": {} }, "id": "6d6c847d-7417-4780-8a8b-b99996cd6166", "name": "Aggregate", "type": "n8n-nodes-base.aggregate", "typeVersion": 1, "position": [ 1600, 500 ] }, { "parameters": {}, "id": "1ec54b09-7533-4280-8bf2-54407d6bf134", "name": "Execute Workflow Trigger", "type": "n8n-nodes-base.executeWorkflowTrigger", "typeVersion": 1, "position": [ 1000, 500 ] } ], "pinData": {}, "connections": { "Code": { "main": [ [ { "node": "Filter", "type": "main", "index": 0 } ] ] }, "Filter": { "main": [ [ { "node": "Aggregate", "type": "main", "index": 0 } ] ] }, "Execute Workflow Trigger": { "main": [ [ { "node": "Code", "type": "main", "index": 0 } ] ] } } } - Copy the workflow ID from workflow URL. The ID is the group of random numbers and letters at the end of the URL.
- In the AI workflow, select the Tool output on the AI Agent. n8n opens the nodes panel.
- Select Custom n8n Workflow Tool. n8n adds the node to the canvas and opens it.
- Configure the node parameters:
- Name:
Fruit - Description:
Call this tool to get a list of fruit. - Workflow ID: Paste in the workflow ID that you copied from the example workflow URL.
- Field to Return:
data. This is the name of the item created in the Aggregate node in the example workflow.
- Name:
-
Select Add Value in Workflow Values to pass information to the workflow you're calling. Configure the value as follows:
- Name:
visibility - Type: String
- Value:
public
n8n makes this value available to the workflow in the output data of the trigger node in the workflow you're calling. In this example, to access the value in an expression, use
{{ $('Execute Workflow Trigger').item.json.visibility }}. You can see this in practice in the Filter node in the sample workflow. - Name:
Step seven: Test the workflow#
You can now try out the workflow: close any open nodes, then select Chat to start talking with the AI. Ask Please give me a list of fruits. The AI Agent node executes the workflow you specified in Workflow ID, passing in the value of visibility from the Workflow Values field. The workflow generates some sample data, filters it to remove any items that aren't set to public, and returns the resulting data.
Next steps#
- Explore n8n using the Quickstarts.
- Learn more about AI concepts and view examples in Examples and concepts.
- Browse AI Workflow templates.
- Read What product people need to know about LangChain to learn more about AI concepts and terminology.