Webhook#
Use the Webhook node to create webhooks, which can receive data from apps and services when an event occurs. It's a trigger node, which means it can start an n8n workflow. This allows services to connect to n8n and run a workflow.
You can use the Webhook node as a trigger for a workflow when you want to receive data and run a workflow based on the data. The Webhook node also supports returning the data generated at the end of a workflow. This makes it useful for build a workflow to process data and return the results, like an API endpoint.
The webhook allows you to trigger workflows from services that don't have a dedicated app trigger node.
Examples and templates
For usage examples and templates to help you get started, refer to n8n's Webhook integrations list.
Build and test workflows#
While building or testing a workflow, use a test webhook URL. Using a test webhook ensures that you can view the incoming data in the editor UI, which is useful for debugging. Select Test step to register the webhook before sending the data to the test webhook. The test webhook stays active for 120 seconds.
When using the Webhook node on the localhost, run n8n in tunnel mode: npm with tunnel or Docker with tunnel.
Production workflows#
When your workflow is ready, switch to using the production webhook URL. You can then activate your workflow, and n8n runs it automatically when an external service calls the webhook URL.
When working with a Production webhook, ensure that you have saved and activated the workflow. Data flowing through the webhook isn't visible in the editor UI with the production webhook.
Node parameters#
These are the main node configuration fields.
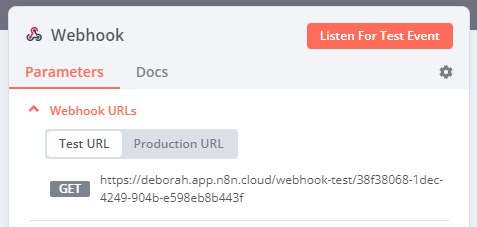
Webhook URLs#
The Webhook node has two URLs: test URL and production URL. n8n displays the URLs at the top of the node panel. Select Test URL or Production URL to toggle which URL n8n displays.
- Test: n8n registers a test webhook when you select Listen for Test Event or Test workflow, if the workflow isn't active. When you call the webhook URL, n8n displays the data in the workflow.
- Production: n8n registers a production webhook when you activate the workflow. When using the production URL, n8n doesn't display the data in the workflow. You can still view workflow data for a production execution: select the Executions tab in the workflow, then select the workflow execution you want to view.
Authentication#
You can require authentication for any service calling your webhook URL.
- Basic Auth: a method of authentication where calls to the webhook URL must include the username and password in the request header.
-
Header Auth: a method of authentication where calls to the webhook URL must include the specified header parameter. For example, use this method when you want to authenticate using an API key or an access token.
Credential data can vary
The Credential Data required for header auth credentials depends on the type used. For example, if you need to provide an
Authorization: Bearer <token>header, the Credential DataNamewill beAuthorizationand theValuewill beBearer <token>.
HTTP Method#
The Webhook node supports standard HTTP Requests.
Path#
By default, this field contains a randomly generated webhook URL path, to avoid conflicts with other webhook nodes.
You can manually specify a URL path, including adding route parameters. For example, you may need to do this if you use n8n to prototype an API, and want consistent endpoint URLs.
The Path field can take the following formats:
/:variable/path/:variable/:variable/path/:variable1/path/:variable2/:variable1/:variable2
Respond#
- Immediately: the Webhook node returns the response code and the message Workflow got started.
- When Last Node Finishes: the Webhook node returns the response code and the data output from the last node executed in the workflow.
- Using 'Respond to Webhook' Node: the Webhook node responds as defined in the Respond to Webhook node.
Response Code#
Customize the HTTP response code that the Webhook node returns upon successful execution.
Response Data#
Choose what data to include in the response body.
Node options#
Select Add Option to view more configuration options. The available options depend on your node parameters. Refer to the table for option availability.
- Binary Property: enabling this setting allows the Webhook node to receive binary data, such as an image or audio file.
- Ignore Bots: ignore requests from bots like link previewers and web crawlers.
- No Response Body: enable this to prevent n8n sending a body with the response.
- Raw Body: specify that the Webhook node will receive data in a raw format, such as JSON or XML.
- Response Content-Type: choose the format for the webhook body.
- Response Data: send custom data with the response.
- Response Headers: send additional headers in the Webhook response. Refer to MDN Web Docs | Response header to learn more about response headers.
- Property Name: by default, n8n returns all available data. You can choose to return a specific JSON key, so that n8n returns the value.
- Allowed Origins (CORS): set the permitted cross-origin domains.
| Option | Required node configuration |
|---|---|
| Binary data | Either: HTTP Method > POST HTTP Method > PATCH HTTP Method > PUT |
| Ignore Bots | Any |
| No Response Body | Respond > Immediately |
| Raw Body | Any |
| Response Content-Type | Both: Respond > When Last Node Finishes Response Data > First Entry JSON |
| Response Data | Respond > Immediately |
| Response Headers | Any |
| Property Name | Both: Respond > When Last Node Finishes Response Data > First Entry JSON |
| Allowed Origins (CORS) | Any |
Use the HTTP Request node to trigger the Webhook node#
The HTTP Request node makes HTTP requests to the URL you specify.
- Create a new workflow.
- Add the HTTP Request node to the workflow.
- Select a method from the Request Method dropdown list. For example, if you select GET as the HTTP method in your Webhook node, select GET as the request method in the HTTP Request node.
- Copy the URL from the Webhook node, and paste it in the URL field in the HTTP Request node.
- If using the test URL for the webhook node: execute the workflow with the Webhook node.
- Execute the HTTP Request node.
Use curl to trigger the Webhook node#
You can use curl to make HTTP requests that trigger the Webhook node.
Note
In the examples, replace <https://your-n8n.url/webhook/path> with your webhook URL.
The examples make GET requests. You can use whichever HTTP method you set in HTTP Method.
Make an HTTP request without any parameters:
1 | |
Make an HTTP request with a body parameter:
1 | |
Make an HTTP request with header parameter:
1 | |
Make an HTTP request to send a file:
1 | |
/path/to/file with the path of the file you want to send.
Send a response of type string#
By default, the response format is JSON or an array. To send a response of type string:
- Select Response Mode > When Last Node Finishes.
- Select Response Data > First Entry JSON.
- Select Add Option > Property Name.
- Enter the name of the property that contains the response. This defaults to
data. - Connect an Edit Fields node to the Webhook node.
- In the Edit Fields node, select Add Value > String.
- Enter the name of the property in the Name field. The name should match the property name from step 4.
- Enter the string value in the Value field.
- Toggle Keep Only Set to on (green).
When you call the Webhook, it sends the string response from the Edit Fields node.